
Handheld shake usually gets worse when your arms and grip are doing more work than they need to. A steadier view starts with a relaxed two-handed hold, elbows supported by your body when possible, and a stance that lets larger muscles carry the load. Walls, rails, trees, knees, and short resting surfaces can add useful support without turning every viewing session into a gear setup. If those changes stop helping, magnification, binocular weight, viewing duration, or the need for external support may be the real constraint.
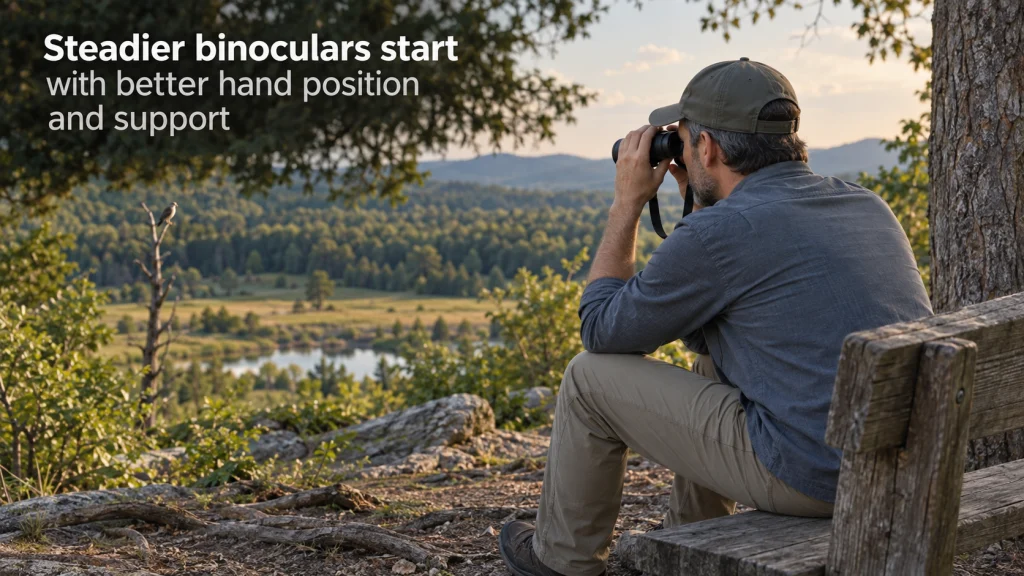
Shake often grows because your body is working harder over time
Learning how to hold binoculars steady is less about finding one magic grip than reducing unnecessary movement before fatigue has time to build. A view that looks acceptable for the first few seconds can start drifting as the shoulders rise, the hands tighten, and the elbows float away from the torso. That is why the first fixes belong in basic handheld stabilization methods, not in a shopping cart. The broader binocular use guide covers setup and viewing habits beyond steadiness itself.
The useful test is simple: change one part of your hold, then watch whether the image becomes easier to keep on the same detail. If relaxing your hands helps, tension was part of the problem. If bringing the elbows inward helps more, upper-body support mattered more than grip pressure. If neither change is enough after a longer look, the limiting factor may be the optic, the viewing duration, or the lack of a stable support point rather than a failure of technique.

This 8x42 binocular uses BaK-4 prisms and multi-coated optics. Its waterproof body is protected by rugged rubber armor. The model is built for outdoor birding and nature viewing.
Check on AmazonIf you click this link and buy, we earn a commission at no additional cost to you.
Start by reducing muscle tension before changing your stance
A hard squeeze feels controlled, but it can make the binoculars move with every small correction in your hands. Nikon and Fujifilm both advise holding the binoculars with both hands while avoiding an excessively tight grip, which is a useful starting point because it keeps the load supported without turning the hands into a clamp. Let the barrels or body rest securely across the fingers and thumbs, then wrap the remaining fingers around them with only enough pressure to prevent slipping. Your shoulders should stay down rather than creeping toward your ears as you try to force the image still.
Breathing should stay normal and unforced while you observe. A brief natural pause in the breathing cycle can make a fine detail easier to inspect, but deliberately holding your breath for a long stretch is not a reliable steadiness strategy and can increase tension elsewhere. The goal is to remove extra effort, not to freeze your whole body. If you have to clench your jaw, lock your shoulders, or squeeze the barrels harder as the seconds pass, reset the hold instead of trying to overpower the shake.
| Try first | What you change | What the result tells you |
|---|---|---|
| Relax the grip | Support the binoculars without squeezing them | If the image settles, hand tension was adding movement |
| Drop the shoulders | Remove the shrugging posture that often appears with fatigue | If the hold feels easier, upper-body tension was part of the load |
| Reset after a short rest | Lower the binoculars briefly, then raise them again with the same grip | If steadiness returns, duration and fatigue are affecting the view |
Use the table as a quick diagnostic rather than as a rigid sequence that must feel identical for everyone. Hand size, barrel shape, balance, eyecup position, and viewing angle all change what feels natural. The important comparison is your own view before and after each adjustment. That keeps the test practical without pretending one grip is universally best.

This 8x42 binocular uses phase-coated BaK-4 prisms and fully multi-coated optics. Its waterproof body is protected by durable rubber armor. Twist-up eyecups support viewing with or without glasses.
Check on AmazonIf you click this link and buy, we earn a commission at no additional cost to you.
Bring the elbows into a position your torso can actually support
Floating elbows make your shoulders carry more of the binoculars’ weight, which becomes harder to sustain as the viewing period lengthens. Bring the elbows inward until they can rest lightly against the sides of your torso instead of pointing outward. Nikon specifically recommends bracing the elbows against the body, and Fujifilm gives the same basic advice while warning against lifting the arms unnecessarily. The result is not a perfectly motionless image, but it gives your arms a larger and more stable structure to work from.
Do not force your elbows into a position that twists your wrists or prevents normal access to the focus wheel. Some binoculars are short enough that a close elbow position feels natural, while a longer body or a different hand size may require a slightly wider hold. Face contact can also help when the eyecups are already adjusted correctly for your eyes, but it should be light and comfortable rather than a hard press. Eyeglass wearers in particular should avoid turning face pressure into a substitute for correct eyecup position and eye relief.
- Keep both hands supporting the binoculars rather than letting one hand do most of the work.
- Move the elbows inward until the torso can share the load without forcing the wrists.
- Keep the shoulders relaxed and the focus control reachable.
- Use light face contact only when it matches your normal viewing position and eyecup setup.
If these changes reduce the movement but do not remove it, that is normal. Handheld viewing always contains some body motion, and magnification makes that motion easier to see. The next useful step is not to squeeze harder. It is to give the body a more stable reference point.

This 8x25 pocket binocular uses BaK-4 prisms and multi-coated optics. Its waterproof body is protected by rubber armor. The package includes a carrying case, neck strap, and cleaning cloth.
Check on AmazonIf you click this link and buy, we earn a commission at no additional cost to you.
Borrow stability from walls, rails, trees, or your own knees
A solid object can remove more movement than another small grip adjustment because it supports part of your body instead of asking your muscles to hold everything in space. Lean a shoulder or upper back against a wall or tree when the viewing direction allows it. A stable railing or other fixed surface can support the forearms or elbows, and a low surface can sometimes support the binoculars directly if it is clean and does not risk scratching or dropping them. Nikon and Fujifilm both recommend using nearby solid structures as practical support when available.
Seated viewing creates another useful support geometry without adding equipment. Sit with both feet placed securely, then rest the elbows on the knees or thighs at a height that does not make you hunch forward aggressively. If the target is higher, a chair back, armrest, or wall behind you may reduce the amount of upper-body work better than trying to keep the same standing posture. The point is not that sitting is always superior, but that changing the support path can matter more than refining the same tired stance.
Choose support points for stability and safety, not just convenience. Avoid unstable gates, loose branches, hot surfaces, wet rails, vehicle surfaces that may move, or anything that puts the binoculars at risk of being knocked down. A good brace should let you relax more, not make you balance awkwardly. If you are still fighting the view while braced, move on to the next variable instead of applying more force.

This collapsible stool uses a retractable telescoping design with adjustable heights. It is rated for loads up to 400 pounds. The portable folding design is intended for camping, hiking, fishing, and travel.
Check on AmazonIf you click this link and buy, we earn a commission at no additional cost to you.
Use the neck strap for light tension rather than as a hard brace
A neck strap can add a small amount of directional tension when it is already attached securely and adjusted to a comfortable length. With the binoculars raised normally, a gentle forward pressure can take up slack and create another point of resistance against small hand movements. The pressure should remain light enough that the strap does not pull on your neck or change the eyepiece position at your face. Think of it as reducing free play, not locking the binoculars into place.
Do not wrap or cinch the strap around the neck, arms, or body in a way that creates entanglement or makes it hard to lower the binoculars immediately. Strap designs, attachment points, and adjustment ranges vary, so a method that feels controlled with one setup can feel awkward with another. If light tension makes the binoculars tilt, lifts the eyecups away from the eyes, or causes neck discomfort, stop using tension and return to a normal hold. The strap’s first job is secure carrying, and any stabilization benefit is secondary.
This is also a good place to separate small gains from meaningful gains. If the strap helps only a little but bracing the elbows or sitting helps a lot, use the larger improvement first. The technique should simplify the hold rather than add a complicated sequence. When the view requires constant management, the underlying constraint is probably bigger than strap tension can solve.

This neoprene strap is designed for small cameras and binoculars. Its quick-release connectors let the main strap detach from the equipment. The adjustable design can be worn around the neck or over a shoulder.
Check on AmazonIf you click this link and buy, we earn a commission at no additional cost to you.
Change your stance or sit down before assuming you need more gear
Standing squarely is convenient, but it is not always the easiest position for a long look. A slightly staggered stance can make it easier to keep the torso quiet, especially when you are turning toward a target rather than facing it directly. Keep the knees relaxed and avoid leaning backward to counterbalance the binoculars. If the view becomes worse as your arms tire, sitting is usually a more useful experiment than continuing to refine the same standing grip.
Once seated, support the arms in a way that keeps your neck and back reasonably neutral for the target’s height. A stable chair with arm support can reduce the work required from the shoulders, while elbows on the knees can work well for targets closer to horizontal. For a higher viewing angle, shift the whole body or use a back support instead of craning the neck and trying to hold the binoculars farther from the body. Better support should reduce effort across the whole viewing posture, not move the strain from the arms to another joint.
Run a short comparison from the same location and on the same target. Observe standing, then seated, then seated with the elbows supported if that is available. If the detail becomes easier to hold only after the posture change, the issue was not simply hand technique. That distinction matters because it keeps you from blaming the optics before testing a zero-cost change in body support.

This black one-pack collapsible stool provides 12 height positions from 2.4 to 17.5 inches. The frame and seat use plastic construction. Its retractable design folds into a compact portable form for transport.
Check on AmazonIf you click this link and buy, we earn a commission at no additional cost to you.
Factor magnification, weight, and viewing duration into the same decision
Technique cannot be judged apart from the binoculars you are holding. Higher magnification makes angular movement more visible, while greater weight can increase fatigue even when the initial grip feels comfortable. That does not mean a particular magnification is automatically too high for handheld use, because hand fit, balance, posture, and viewing duration differ from person to person. It does mean that a setup that works well for quick looks may become much less pleasant when you stay on the same distant detail for several minutes.
Compare the image at the beginning of a viewing period with the image after your arms have been supporting the binoculars for a while. If the movement grows with time and improves immediately after a short rest, fatigue is likely part of the practical limit. If the view remains difficult even with relaxed hands, inward elbows, and a solid brace, magnification or overall handling may be asking more than your current handheld setup can comfortably deliver. The related explanation of why binoculars appear to shake goes deeper into the sources of visible movement.
This is where the idea of a “steady binocular grip” needs context. A good grip should make the binoculars easier to control, but it cannot cancel the way magnification enlarges visible motion or the way fatigue accumulates. A lighter or lower-magnification configuration may be easier for some users, while another person may prefer more image scale and accept more support. The right conclusion comes from the viewing task, not from a universal handheld limit.

This compact 8x32 binocular uses phase-coated optics and BaK-4 prisms. It is waterproof and fogproof for outdoor use. The 32mm model is designed as a lightweight travel binocular.
Check on AmazonIf you click this link and buy, we earn a commission at no additional cost to you.
Know when handheld technique has reached its useful limit
Handheld technique has reached its limit when the remaining movement is no longer meaningfully reduced by relaxing the grip, supporting the elbows, changing posture, or borrowing a stable surface. At that point, repeating the same corrections usually adds effort without adding much steadiness. Long observation periods and higher magnification are common reasons external support becomes more useful, and Nikon explicitly identifies those situations as cases where tripod use can help. That is a decision boundary, not a rule that every high-magnification binocular must be mounted.
Before adding support equipment, repeat the comparison on a target that is easy to locate and focus. Confirm that interpupillary distance, eyecup position, focus, and diopter are already set correctly so a fit or focus problem is not being mistaken for movement. Then compare unsupported standing, braced standing, and seated support under the same viewing conditions. If the image still moves more than the task tolerates, the next step is to evaluate when a tripod becomes worthwhile rather than forcing more tension into the handheld technique.
A practical stopping rule keeps this article in the right lane. The goal here is to get the most out of a handheld view without immediately buying support equipment. Once a mount, adapter, or support system becomes the answer, compatibility and setup are separate decisions that depend on the exact binocular. Handheld skill is valuable, but it should not become a test of endurance.

This metal adapter connects compatible roof and Porro binoculars to a standard 1/4-20 tripod mount. It installs at a compatible binocular mounting point without a permanent modification. The adapter is intended to provide stable hands-free viewing on a tripod.
Check on AmazonIf you click this link and buy, we earn a commission at no additional cost to you.
Use a short stability check before changing anything else
A repeatable check is more useful than judging steadiness from a single glance. Pick one stationary detail at a comfortable distance, focus carefully, and watch how easily you can keep that detail near the same part of the field. Start with your normal hold, then change only one variable at a time so you can tell what actually helped. The purpose is not to measure laboratory stability, but to make your own before-and-after comparison less vague.
Work from the least burdensome change to the most supportive one. Relax the hands, bring the elbows inward, use a stable wall or rail, then sit or support the elbows if the viewing situation allows it. Give each position enough time to reveal whether fatigue returns, because a grip that feels excellent for a few seconds may not stay excellent. Stop when the view is steady enough for the task rather than chasing a completely motionless image that handheld viewing may not provide.
- Use the same target and roughly the same viewing angle for each comparison.
- Change one variable at a time so the effect is easier to judge.
- Notice both image movement and the amount of effort required to control it.
- Prefer the simplest position that gives enough steadiness for the observation.
- Move to external support only when the remaining movement still interferes with the task.
This ladder also prevents a common mistake: adding complexity before identifying the actual source of instability. Sometimes the answer is a looser grip, sometimes it is a wall, and sometimes the binoculars simply need more support for that magnification and duration. A useful technique earns its place by reducing movement without creating more strain. That is the standard to keep.

This four-section monopod extends to 67 inches and supports equipment up to 6.6 pounds. It uses a rubber foot for ground contact. A carrying bag is included for transport.
Check on AmazonIf you click this link and buy, we earn a commission at no additional cost to you.
Final Thoughts: steadiness is a system of body, optic, and time
Steadier handheld viewing comes from reducing unnecessary effort and giving the binoculars better support through your body. Start with a secure but relaxed two-handed hold, bring the elbows into a position the torso can support, and use a wall, rail, tree, chair, or your knees when the situation allows it. Keep breathing natural, and lower the binoculars for a short reset when tension starts building. These changes cost nothing and reveal whether technique is the main constraint.
If the image still moves too much after those changes, stop treating the problem as a grip contest. Magnification, weight, balance, viewing angle, and observation time all influence how manageable a handheld view feels. At some point a different posture, a more suitable configuration, or external support will do more than another grip variation. The useful skill is not holding perfectly still, but recognizing which part of the viewing system needs to change next.

This lightweight black tripod extends to 60 inches and includes a carrying bag. The selected listing is the 60-Inch Tripod Only variant. Its three-leg support platform is intended for compatible mounted equipment.
Check on AmazonIf you click this link and buy, we earn a commission at no additional cost to you.
FAQs
🔭 How should I hold binoculars to reduce shake?
Use both hands, keep the grip secure without squeezing hard, and bring the elbows inward so your torso can share the load. If possible, add a solid brace such as a wall, rail, tree, chair arm, or your knees.
🫁 Should I hold my breath to keep binoculars steady?
Do not rely on a long breath hold as your main stabilization technique. Keep breathing relaxed, and use a brief natural pause only if it happens comfortably while you inspect a detail.
💪 Does gripping binoculars harder make them steadier?
Usually not. Excessive grip pressure can add tension and small hand movements, so support the binoculars securely while keeping the hands and shoulders as relaxed as the situation allows.
🪑 Is sitting steadier than standing with binoculars?
It can be, especially when sitting lets you support your elbows or back. The useful test is whether the seated position reduces both visible movement and the effort needed to hold the binoculars on the same target.
🌳 What can I use as support if I do not have a tripod?
A stable wall, tree, railing, chair arm, knee, or short fixed surface can help. Use only a support point that is secure, clean enough for the contact being made, and safe for both you and the binoculars.
🔎 Are 10x binoculars always too shaky to use by hand?
No. Higher magnification makes motion more visible, but whether 10x is acceptable handheld depends on the binoculars’ weight and balance, your support position, viewing duration, and how much movement the task tolerates.
References and Sources
- Nikon, how to hold and tripod use: Supports the relaxed two-handed grip, elbows against the body, environmental bracing, and the move to tripod support for longer or higher-magnification viewing.
- Fujifilm binocular instructions: Supports avoiding an excessively tight grip, keeping elbows against the body, and using nearby stable structures to reduce shake.
- Space.com, how to hold binoculars steady: Provides additional practical context for supported elbows, seated viewing, and using the environment to reduce fatigue during longer observation.