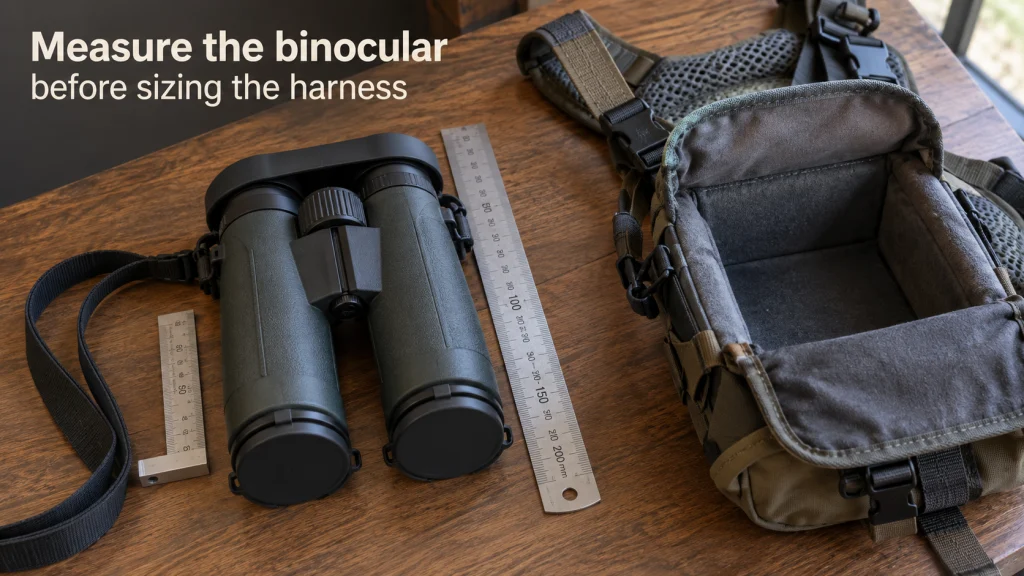
Binocular harness sizing works best when you measure the binocular in the exact configuration you plan to carry, not when you assume every 8×42 or 10×42 needs the same pouch. Overall length can change with eyecup position, while hinge width, caps, a rainguard, and fixed connectors can change the space the binocular actually occupies. Measure first, compare those numbers with the manufacturer’s usable compartment dimensions, then confirm that the binocular can enter, close, and come back out without binding. A model chart is useful confirmation, but the physical dimensions remain the better starting point when your exact configuration is not listed.
Measure the binocular you actually carry
Binocular harness sizing should start with the binocular on the table in its normal carry configuration, because the label on the objective end does not describe its exterior geometry. Two binoculars marked 8×42 can differ in body length, bridge shape, barrel spacing, armor thickness, and the way their eyecups sit when adjusted. That is why a size chosen from the configuration name alone can be unexpectedly tight or unnecessarily roomy. The useful question is not what class the binocular belongs to, but how much space this exact binocular occupies when it is ready to go into the pouch.
If you are still deciding whether this carry system suits the way you use your optics, start with the broader binocular harness guide before worrying about pouch size. For the wider context of straps, cases, adapters, and other carry options, the binocular accessories guide helps separate a fit problem from an accessory-choice problem. Once the harness family is already chosen, this article stays narrow: measure the binocular, compare the compartment, and check access. Torso adjustment, shoulder comfort, and preferred carry height are separate decisions and should not be used to excuse a poor compartment fit.

This 10x42 roof-prism binocular has adjustable twist-up eyecups, a center focus wheel, and rubber armor. It is tripod adaptable and includes a GlassPak harness. Its full-size body gives a concrete example of why carried dimensions should be measured instead of inferred from the 10x42 label.
Check on AmazonIf you click this link and buy, we earn a commission at no additional cost to you.
Build the measurement set before choosing a harness size
Use a rigid ruler or a tape that can be held straight, and write down the dimensions instead of trying to remember them while shopping. Measure the binocular with the hinge set where you normally use it and with the eyecups in the position you actually carry, because both settings can change the outer envelope. Keep the lens caps, rainguard, and any connector that remains attached during storage in place if they will go into the compartment with the binocular. The goal is to record the carried shape, not the clean catalog shape.
A useful measurement set contains three numbers and one configuration note. Record overall length, maximum width at the normal hinge setting, and maximum depth through the thickest part of the body or attached cover. Then note the eyecup position and which accessories were installed during measurement so you can reproduce the setup later. This prevents a common mistake where a shopper compares a bare-binocular specification with a harness that must accommodate a bulkier real-world setup.
Overall length with eyecups in the normal carry position
Measure from the furthest point at the objective end to the furthest point at the eyepiece end while the eyecups are set where you normally leave them for carry. FHF Gear specifically tells users to measure after adjusting the eyecups to their preferred position, and its sizing guidance treats binocular length as a primary fit factor. That matters because extending the eyecups can add enough length to change how a lid closes even when magnification and objective size have not changed. Do not collapse the eyecups just to make the number smaller unless that is genuinely how you carry the binocular.
Width at the normal hinge setting
Set the hinge to your normal interpupillary distance before measuring width, rather than folding the barrels together to create the smallest possible number. The widest point may be the objective barrels, armor, bridge area, or a fixed attachment point, so measure the actual maximum rather than assuming the front end is always widest. A binocular that is short enough for a compartment can still bind at the sides if its normal hinge setting produces a broad footprint. Keeping the hinge at its working position also reduces the need to readjust the binocular every time you pull it from the harness.
Depth with caps, rainguard, and fixed connectors
Depth is easy to overlook because many compatibility charts emphasize length and width, yet the thickest front-to-back dimension can determine whether a structured pouch closes cleanly. Include any objective caps that stay attached, the rainguard if it remains over the eyepieces, and fixed strap or tether connectors that sit inside the compartment. Do not include removable items that you never store with the binocular, because that would make the measurement less representative. The resulting number should describe the thickest point the pouch must accept without forcing the body against its walls.
- Length: objective end to eyepiece end with eyecups in the normal carry position.
- Width: widest point with the hinge set for normal viewing.
- Depth: thickest point with carried caps, rainguard, and fixed connectors installed.
- Configuration note: record eyecup position and the accessories included in the measurement.
Blank sizing worksheet: fill this in with the binocular configured exactly as it will sit in the harness. Leave the measurement cells empty until the eyecups, hinge, covers, and fixed connectors are in their normal carry positions.
| Item to record | Your measurement or setting |
|---|---|
| Overall length | |
| Maximum width at normal hinge setting | |
| Maximum depth with carried accessories | |
| Eyecup position | |
| Caps, rainguard, and fixed connectors included |
These four notes are enough to make the next comparison disciplined rather than approximate. They also make it easier to revisit sizing later if you change eyecup position, add a different connector, or move the same binocular to another carry system. If a manufacturer gives a different measuring instruction for its pouch, follow that system when comparing with that particular chart. The important rule is consistency between what you measure and what the published compartment dimensions actually represent.

This elastic Bino/Cam Harness uses Uni-Loop quick-disconnect connectors and fits most binoculars. The self-adjusting design stabilizes gear against the body while remaining fully adjustable. Its detachable connector loops are the kind of carry hardware that can remain attached when measuring the binocular in its real storage configuration.
Check on AmazonIf you click this link and buy, we earn a commission at no additional cost to you.
Compare those numbers with the harness interior, not the product label
Once you have the binocular measurements, compare them with the harness maker’s stated internal or usable compartment dimensions. Badlands, for example, publishes interior height, width, and depth for several harness sizes, which makes the comparison more useful than a generic small, medium, or large label. Those labels are not standardized across brands, so a medium from one system should not be expected to equal a medium from another. The numbers are the transferable information; the size name is only meaningful inside that manufacturer’s own system.
Do not invent a universal clearance allowance such as adding a fixed fraction of an inch to every dimension. Soft materials, molded walls, lid shape, interior seams, spacers, and closure geometry can all change how much of the listed space is practically usable. A dimension that looks comfortable on paper may still feel restrictive if the binocular catches on a seam or if the lid must be stretched into place. Treat the numerical comparison as a screening step, then verify the actual access path and closure behavior.
Internal length is usually the first rejection point
Length deserves the first check because an overlong binocular can interfere directly with the top closure or lid geometry. FHF Gear’s guidance is useful here because it links proper sizing to binocular length after eyecup adjustment rather than to objective size shorthand. If your carried length already exceeds the maker’s stated usable height or falls outside its compatibility guidance, there is little value in trying to rescue the fit with width alone. Reject the size and move to the next documented option rather than assuming fabric compression will solve the mismatch.
Width and depth can still create binding
Passing the length check does not prove the binocular will enter the pouch smoothly. A wide hinge setting can make the barrels drag against the sides, while a thick rainguard or connector can create a pressure point even when the bare body fits. The harness should not require you to squeeze the binocular into a narrower shape every time you store it, because that means the measured working configuration and the compartment are mismatched. Width and depth are therefore secondary checks, not optional checks.
| Check | What to measure | What a mismatch usually means |
|---|---|---|
| Length | Objective end to eyepiece end with normal eyecup position | The lid may not close as designed or may press on the eyecups |
| Width | Widest point at the normal hinge setting | The barrels or bridge may rub or require squeezing during insertion |
| Depth | Thickest point with carried covers and fixed connectors | The body may bind against the front, rear, or closure structure |
| Configuration | Eyecup setting and accessories included during measurement | A chart comparison may be based on a different physical setup |
A simple chart-reading example shows why all three dimensions matter. Suppose a binocular measures 6.1 inches long, 5.2 inches wide, and 2.6 inches deep in its actual carry configuration. One hypothetical harness lists a usable compartment of 6.4 by 5.4 by 2.5 inches, while the next size lists 6.8 by 5.6 by 2.9 inches. The first option passes length and width but fails depth, so it should be rejected before an access test.
| Dimension | Measured binocular | Size A interior | Size A result | Size B interior | Size B result |
|---|---|---|---|---|---|
| Length | 6.1 in | 6.4 in | Pass | 6.8 in | Pass |
| Width | 5.2 in | 5.4 in | Pass | 5.6 in | Pass |
| Depth | 2.6 in | 2.5 in | Fail | 2.9 in | Pass |
Size B clears the static comparison, but that does not create a universal clearance rule or prove the fit is finished. It only means none of the measured dimensions exceeds the published usable dimensions in this example. The next step is still to confirm that the opening, lid, seams, and retrieval path work with the binocular in the same configuration. This is why a sizing chart should narrow the choice rather than act as a substitute for an access check.
Use the table as a rejection sequence rather than as a promise of perfect fit. Length can eliminate an obviously unsuitable size first, then width and depth can expose a body shape that the headline configuration hides. After those checks pass, the final question is whether the binocular can be inserted, secured, and retrieved naturally. Static dimensions narrow the choice, but access decides whether the size works as a carry compartment.

This chest pack is built from treated 1000D nylon and uses a four-point cushioned body harness. The listed pack dimensions are 7.08 by 3.54 by 8.66 inches, and the design includes a rangefinder pouch and rain cover. Those published dimensions make it useful for comparing measured binocular geometry with a specific container rather than a generic size label.
Check on AmazonIf you click this link and buy, we earn a commission at no additional cost to you.
Check the access path after the static fit passes
A binocular can technically fit inside a compartment and still be a poor match if the opening makes every retrieval awkward. Insert the binocular in the orientation the manufacturer intends, close the pouch normally, then remove it without twisting the hinge, stripping off the rainguard, or pulling the body through the opening at an angle. Repeat the motion enough times to notice where the body contacts the sides or closure. The objective is smooth access with the carried configuration unchanged, not the smallest possible pouch at any cost.
Also check how the binocular settles after you let go of it inside the compartment. It should not require force to reach its resting position, and the lid or closure should work as designed without being stretched around the eyecups. At the other extreme, a much larger compartment can leave the binocular moving around more than you want or sitting too low for an easy grip. Static fit, closure fit, and retrieval fit should agree before you call the size correct.
Too tight slows retrieval
A tight fit often shows up first as friction at the objective barrels, bridge, rainguard, or eyecups. If you have to compress the binocular, change the hinge setting, or peel the lid around it, the compartment is asking the equipment to change shape to suit the pouch. That can turn a simple grab-and-view motion into a small setup routine every time you use the binocular. Move up only according to the manufacturer’s sizing logic rather than guessing at an undocumented size jump.
Too loose allows unwanted movement
Extra room is not automatically safer because a very deep or wide compartment can let the binocular shift or settle lower than intended. FHF Gear’s setup guidance warns that an oversized fit can leave binoculars sitting too shallow in a way that affects closure behavior, which is a useful reminder that larger is not always more forgiving. The right size should provide enough room for natural entry and removal while still supporting the binocular in the position the pouch was designed around. If the system includes manufacturer-provided spacers or height adjustments, use them only as documented rather than improvising a new internal geometry.

This Wolf Brown chest pack uses a magnetic closure for quiet one-handed access and a four-point adjustable harness. Its listed dimensions are 8.66 by 3.35 by 7.28 inches, with three compartments and a removable rangefinder pouch. The opening and closure make it directly relevant to checking whether a binocular that passes static dimensions can still enter and exit naturally.
Check on AmazonIf you click this link and buy, we earn a commission at no additional cost to you.
Use manufacturer model charts as confirmation, not as a substitute for measurements
A model compatibility chart can save time when it lists your exact binocular, exact harness family, and the configuration assumptions behind the recommendation. It is still worth checking your own measurements because product variants, eyecup positions, attached covers, and carry accessories can change the exterior package. The chart should confirm a dimensional conclusion rather than replace it. When a chart and your measured setup disagree, first look for a difference in measurement method before assuming either number is wrong.
Pay particular attention to notes such as eyecups in, eyecups out, spacer required, or a recommendation to move up a size. Those notes reveal that the same nominal binocular class can cross a size boundary when its carried geometry changes. If your exact model is missing, use the maker’s published interior dimensions or contact the manufacturer rather than borrowing a recommendation from a visually similar binocular. A compatibility table is strongest when it is model specific and configuration specific, not when it becomes a shortcut for every binocular with the same objective diameter.

This exact Viper HD variant is an 8x42 roof-prism binocular identified as model V200. It includes a GlassPak chest harness and uses adjustable eyecups, a locking right-eye diopter, and a center focus wheel. Its defined model and configuration make it appropriate for checking model-specific guidance instead of borrowing a recommendation from a visually similar binocular.
Check on AmazonIf you click this link and buy, we earn a commission at no additional cost to you.
Separate binocular compartment fit from torso adjustment and carry preference
Compartment size answers whether the binocular fits the pouch, while torso adjustment answers where and how the harness sits on the wearer. Those are related only after the compartment has passed its own fit check. A pouch that is too short for the binocular does not become correct because the shoulder straps have more range, and a well-sized pouch does not guarantee that every user will prefer the same chest height. Keep the two problems separate so you do not solve the wrong one.
If what you actually need is a roomier front carry system for additional equipment rather than a closer binocular compartment, compare the role of a binocular chest pack instead of automatically increasing harness size. Extra cargo space, torso coverage, and accessory organization are carry-system questions, not evidence that the binocular itself needs a larger compartment. Choose the compartment from the optic’s geometry first, then evaluate body fit and carrying preferences according to the manufacturer’s adjustment instructions. That sequence keeps sizing based on measurable constraints instead of personalizing the wrong dimension.

This black harness uses shock cord and weighs 2.24 ounces. It offers five wearing positions and fast adjustment for changing layers and chest height. Because it is a strap-style harness rather than a rigid pouch, it cleanly illustrates the difference between torso carry adjustment and the separate question of whether a binocular fits inside a compartment.
Check on AmazonIf you click this link and buy, we earn a commission at no additional cost to you.
Compare case sizing only when the problem is storage or transport fit
A protective case and a chest-worn harness may both surround a binocular, but they solve different access problems. A transport case can tolerate a slower opening sequence, more padding, and a different orientation because the binocular is not being drawn repeatedly while you are moving. A harness compartment needs its dimensions to work with the intended closure and retrieval path on the chest. Do not transfer a case size directly to a harness just because both products describe length, width, and depth.
The same measurements are still useful because they describe the binocular rather than the container. If you are choosing storage, compare the measured carried or stored configuration with the case maker’s interior specification and padding assumptions. If you are choosing a harness, return to access, closure, and the manufacturer’s fit instructions after the dimensional screen. The measurement method travels well between products, but the pass or fail rule belongs to the container you are actually buying.

This 8.9-liter hard case uses customizable foam and provides 12 by 9 by 5 inches of internal space. The IP67 weatherproof shell is built for storage and transport rather than chest access. Its published interior dimensions make it a direct fit-check example for applying the article measurement method to a protective case.
Check on AmazonIf you click this link and buy, we earn a commission at no additional cost to you.
Final Thoughts: choose the harness size from actual binocular geometry, then confirm access
Start with the binocular as you really carry it, measure length with the eyecups in their normal position, record width at the working hinge setting, and include the depth added by covers or fixed connectors that stay in the pouch. Compare those numbers with the manufacturer’s usable compartment dimensions or exact model guidance instead of treating 8×42, 10×42, small, or medium as universal fit categories. If a dimension clearly fails, reject that size before trying to rationalize the mismatch. A clean dimensional screen prevents most of the guesswork.
Then test what the numbers cannot prove on their own: the closure, insertion path, resting position, and retrieval motion. A correct fit should let the binocular remain in its normal configuration while the harness works the way its maker intended. Keep torso adjustment and general carrying preference as separate decisions after the compartment fit is established. Measure first, confirm with the chart, and let actual access settle the final size choice.

This 10x42 binocular is tripod adaptable, waterproof, fogproof, and supplied with a GlassPak harness. The roof-prism body uses adjustable eyecups and a defined TRI-1042 model configuration. Pairing a specific binocular with its included carry system reinforces the final sizing sequence of measuring the optic first and then confirming closure and access.
Check on AmazonIf you click this link and buy, we earn a commission at no additional cost to you.
FAQs
📏 How do I measure a binocular for a harness?
Measure overall length with the eyecups in the position you normally carry, then record maximum width at your normal hinge setting and maximum depth with carried caps, rainguard, and fixed connectors installed. Compare those numbers with the harness maker’s stated interior or usable compartment dimensions.
🔭 Can I choose a harness size just because my binocular is 8×42?
No. Two 8×42 binoculars can have different body lengths, widths, hinge geometry, armor, and eyecup positions, so the same configuration label does not guarantee the same pouch fit. Use the actual exterior dimensions or an exact manufacturer compatibility listing.
👁️ Should the eyecups be in or out when I measure?
Measure with the eyecups in the position you normally use for carry unless the harness manufacturer tells you to follow a different method. Eyecup position can change overall length enough to affect lid closure and the recommended size.
🎒 Is a larger harness always safer if I am between sizes?
Not automatically. Extra room can change how the binocular sits, moves, and meets the closure, so follow the manufacturer’s sizing guidance rather than applying a universal larger-is-better rule. If the system documents spacers or a larger size for your configuration, use that guidance.
📐 What if my binocular fits the listed dimensions but feels tight at the opening?
Treat that as an access-path problem rather than declaring the size correct from the numbers alone. Check whether the bridge, barrels, rainguard, or connectors are catching, and compare your configuration with the manufacturer’s instructions before changing size.
References and Sources
- FHF Gear bino harness sizing guide: supports measuring binocular length after setting the eyecups to the preferred position and shows how configuration can change the required size.
- Badlands binocular harness size charts: provides published interior height, width, and depth measurements and model compatibility tables for comparing physical fit.